Custom CSS
SpaBoom is standards-based compliant, and accomplishes all its formatting with the use of Cascading Style Sheets, or CSS.
If you haven't seen the power of CSS, please check out the css Zen Garden for examples of how CSS controls the look-and-feel of a website.
If you're new to CSS, and want to learn more, we recommend the following websites for reference or review:
- Web Design Group's Cascading Style Sheets for a no-nonsense reference on CSS.
- W3C's CSS tutorial starting with HTML + CSS, for an excellent set of basic tutorials.
SpaBoom allows you to use CSS in two ways, depending on how you are utilizing SpaBoom features:
- Linked-in. Linked-in is where we serve up a complete page, and you just link to that page from your website. You can enter your own CSS within SpaBoom, which will appear after the default CSS (so that you can modify it). You can use Custom CSS to style your Header HTML, or to change the CSS that comes from the Style that you've selected.
- Web Services. This pulls SpaBoom content directly into a page located on your website, which provides the advantage of an exact match to your website's look-and-feel. Please reference our guide on mimicking your website, for detailed instructions on how to have SpaBoom mimic the look-and-feel of your website.
Either way, linked-in or web services, CSS will help you really improve how your SpaBoom Instant Gift Certificate functionality looks.
Overview of SpaBoom CSS
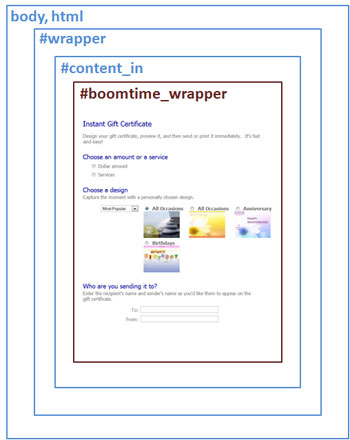
SpaBoom CSS Model
The SpaBoom CSS model is based on the hierarchy above, which provides for a great degree of flexibility in how the page looks and behaves. Think of each box as a container. Each container contains the smaller containers, and is contained by any larger containers.
This means the largest container, body, html, contains all subsequent containers, and #boomtime_wrapper is the smallest container, contained within all the others.
CSS definitions will flow through from larger containers to smaller containers, until changed within a lower container. This means the smaller containers will inherit the CSS from the larger containers, unless there is a new CSS definition within a smaller container. If so, that new CSS definition will flow from that smaller container to any smaller containers.
The blue containers are where you can operate in, and affect CSS changes for the rest of the SpaBoom content.
For web services customers, to make changes to the CSS at the levels indicated with blue text, such as the "body, html", "#wrapper", or "#content_in" levels, you can simply include CSS directly in your file (i.e. the file being used to call the PHP scripts) or you can place your CSS in a separate file that is linked from within your file. Currently, SpaBoom does not support changes at the red level, although there is very little reason why a change at that level would be needed, since most of the important tags are not defined at the red level (i.e. p, h1, h2, etc).
For linked-in customers, you can simply place your CSS definitions in the Custom CSS box that pops up, when you click Experts Only from within Website.
Common CSS changes
Well start with easy changes and move to harder and more complex changes, and throughout the rest of this guide, we assume you are making CSS changes using instant_gift_certificate.php and its corresponding default.css file. The changes below will be to default.css.
The Starting Point
This guide is still helpful for linked-in customers, or web services customers desiring to create their own CSS files, because it includes CSS references that can be used no matter how you use SpaBoom technology.
Headers
If you've created a blank page from your existing website, instead of utilizing SpaBoom's default instant_gift_certificate.php and default.css page; you will notice that the Instant Gift Certificate content takes on much of the style of your existing web page. Background color should match. Font styles and colors should match. Headers should match.
On occasion, something doesn't match. Often, the headers may be different. We've seen this happen, such as when an author of a website uses non-standard tagging for headers. To address this, you must identify the CSS used for your headers, copy the CSS, and define that CSS for normal h1, h2, h3 and h4 tags, as appropriate.
Once you know what the CSS is for your headers, you can simply define it in the file you're editing:
h1
{
	margin: 0;
	padding: 0 0 15px 0;
	font-size: 150%;
	font-weight: normal;
	color: #000099;
}

h2
{
	margin-top: 30px;
	margin-bottom: 0;
	font-size: 130%;
	font-weight: normal;
	color: #000099;
}

h3
{
	font-weight: normal;
	color: #000099;
}
The CSS above is what we've used for the default.css that comes with the SpaBoom API distribution.
Please reference Font Weight, Color and Font Size for more information about these background properties in CSS.
Change the overall background color
If you want to change the entire page, you will need to change the background colors of several containers, not just body, html. Edit default.css, and change the those lines indicated in yellow below:
body
{
	background: #AAAAFF;
	text-align: center;
	padding-bottom: 25px;
}

#wrapper
{
	background: #AAAAFF;
	text-align: left;
	margin: 0px auto;
	color: #666666;
	width: 680px;
	margin: 10px auto;
	border: 1px solid #666666;
}
The above example will turn the entire background of the page a light blue. The light blue is specified with the RGB Hex Color Value of #AAAAFF.
Check out Background Help for more information about the background property in CSS.
Layered background colors
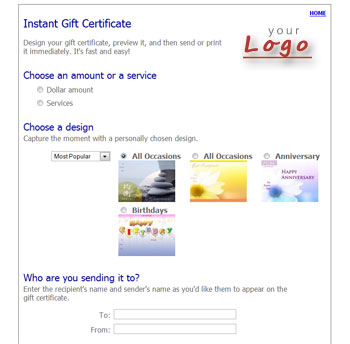
Now heres the power of the nested or layered CSS containers: Suppose you wanted the background to be light blue for the entire page, but you wanted the actual Instant Gift Certificate form to sit on a white background?
The following code should do the trick:
body
{
	background: #AAAAFF;
	text-align: center;
	padding-bottom: 25px;
}

#wrapper
{
	background: #FFFFFF;
	text-align: left;
	margin: 0px auto;
	color: #666666;
	width: 680px;
	margin: 10px auto;
	border: 1px solid #666666;
}
In the example above, the body container is turned light blue, while the #wrapper container remains white.
Check out Background Help for more information about the background property in CSS.
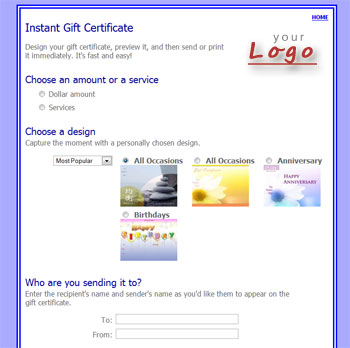
Fun with borders
Suppose you want a more pronounced border around your SpaBoom content? Simply determine which container you want the border around, and indicate a border.
#wrapper
{
	background: #FFFFFF;
	text-align: left;
	margin: 0px auto;
	color: #666666;
	width: 680px;
	margin: 10px auto;
	border: 9px double #0000FF;
}
The above CSS change has created a 9-point double-line dark blue border around the main SpaBoom content.
Check out Border Help for more information about the border property in CSS.
Background and Border Changes
Mixing borders
Suppose we want a solid border on the left, but the double-border on the rest of the page? We have a quirk with CSS, and we would instead have to define each of the four borders separately. So, delete the original border property (shown below as a strike out, and place the four new border properties as shown below:
#wrapper
{
	background: #FFFFFF;
	text-align: left;
	margin: 0px auto;
	color: #666666;
	width: 680px;
	margin: 10px auto;
	border: 9px double #0000FF;
	border-top: 9px double #0000FF;
	border-right: 9px double #0000FF;
	border-bottom: 9px double #0000FF;
	border-left: 9px solid #0000FF;
}
Troubleshooting CSS
Making changes to CSS, but having absolutely no affect?
There could be a number of reasons for this:
- Do you have a semi-colon (;) at the end of each property statement?
- Do you have a colon (:) separating the property from its values?
- Did you mistype the tag name?
- Did you mistype the property name?
- Did you misuse or mistype the value?
- Are you using the proper tag?
Are you sure the CSS you're changing is actually in the file you're trying to modify? The best way to verify this is to look at the source-code of the file when viewing from your website.